Time to read:
In this post we are going to go over how you can install a Wiregaurd Virtual Private Network (VPN) server on Linux and then how to create client configurations to allow clients (peers) to connect to the server. For reference I am using a Fedora 40 server image so if you are using a Debian-based distro then you will need to adjust the installation commands slightly.
With regards to creating the client configurations, I will show you an easy script that will generate the client configurations for you to make it as hands-off as possible.
For reference, my Wireguard client configuration will be on a Windows-based client so the implementation of the configuration may be slightly different depending on your client’s operating system.
- SECTION I – Aim
- SECTION II – Wireguard VPN Server Configuration
- SECTION III – DuckDNS Configuration
- SECTION IV – Wireguard VPN Client Configuration
- SECTION V – Confirmation
- SECTION VI – Footnotes
SECTION I – Aim
Before we start with the configuration let’s just quickly discuss what a VPN is and how I plan on using this VPN.
SECTION I – A – What is a VPN?
A Virtual Private Network (VPN) put simply is a way to have private network communications over a public or untrusted network. VPN traffic is encrypted to ensure the secrecy of the private traffic. The public network could be the internet or it could even be part of a private company’s infrastructure.
Once a VPN tunnel is established between 2 points then the traffic going between the points cannot be deciphered if someone were to capture it.
There are a few common types of VPN:
- Site to site – this VPN type is a single encrypted tunnel between distinct locations. The main thing to note is that with a point-to-point VPN link, both sites are known and don’t move locations. There is a point-to-multipoint VPN architecture that allows multiple remote locations to establish connectivity back to a hub location. Point to multipoint VPN architecture allows remote sites to securely connect to a hub site when the remote locations aren’t known beforehand. An example is the Dynamic Multipoint VPN (DMVPN) technology that allows the point to multipoint VPN architecture.
- Remote access – this is where a centralised VPN server is used for singular clients to connect to allowing the client secure access to the infrastructure behind the VPN server.
- Cloud – with lots of companies using a hybrid architecture between on-premises infrastructure and cloud infrastructure the cloud VPN comes in to allow clients secure access to the company’s cloud infrastructure. This could be achieved through the client connecting to an application that facilitates a secure VPN link to the cloud infrastructure.
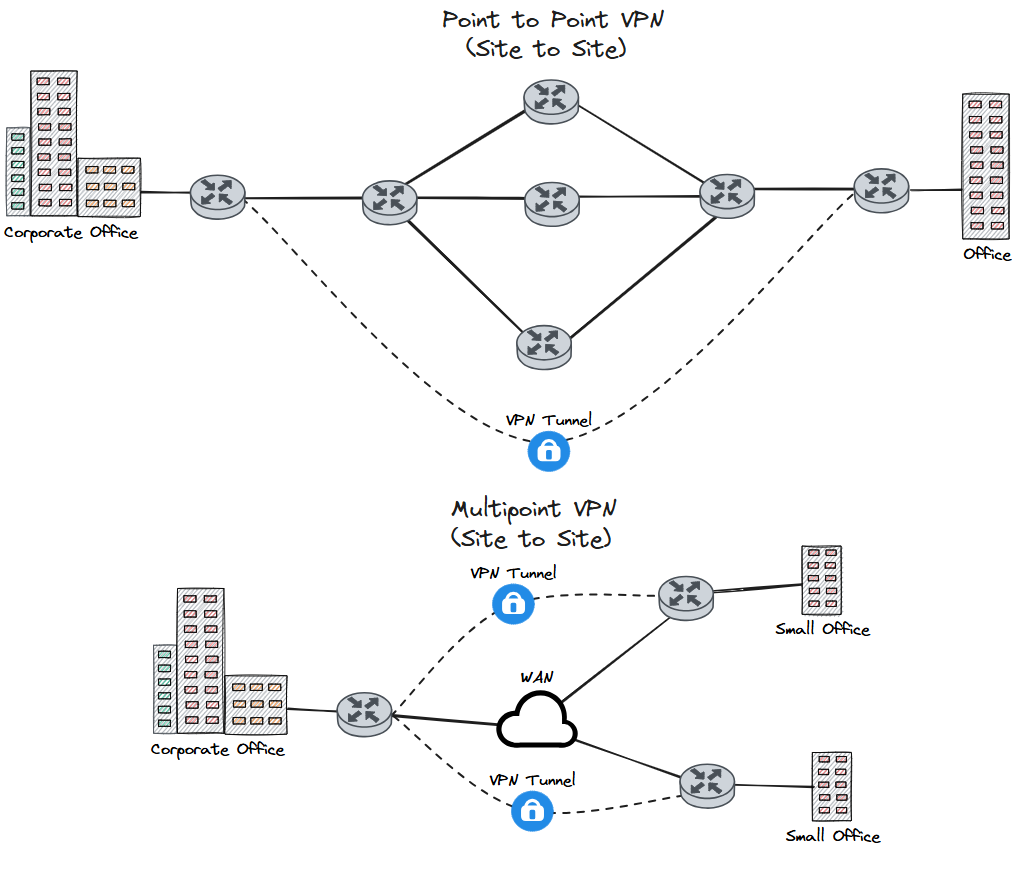
FIGURE 1 – Site to Site VPN Diagram
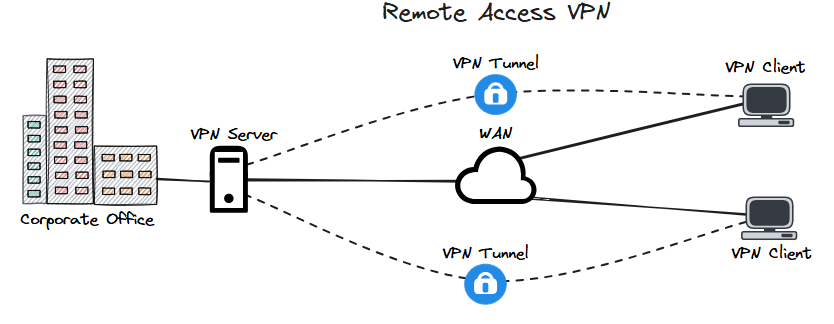
FIGURE 2 – Remote Access VPN Diagram
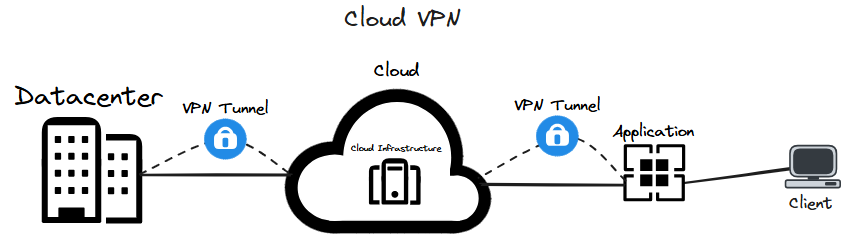
FIGURE 3 – Cloud VPN Diagram
SECTION I – B – My Usecase
Now that we have discussed what a VPN is let’s go over the implementation that I am setting up throughout this post.
The goal here is to provide a secure way to access the resources on my homelab securely from anywhere. This means I can continue to work on my homelab away from home without having to worry about exposing myself to the world. There are many different ways that you can establish a VPN, for example, you could use OpenVPN, an IPsec VPN but, in my case, I am going to use Wireguard.
With a client set up to securely tunnel to my VPN server, I can then connect to a Remote Desktop Services (RDS) server that is located on the Local Area Network (LAN) side of my VPN server.
An important thing to note here is that I am using a typical home router that is issued a dynamic public Internet Protocol (IP) address from my Internet Service Provider (ISP). This means that my public IP address may change. So I need a way to allow my VPN clients to always know where my VPN server is located at all times without having to manually update each client to point to my public IP every time it changes. For this, I am going to use Dynamic Domain Name System (DDNS) to dynamically resolve my public IP address.

FIGURE 4 – Network Diagram
SECTION II – Wireguard VPN Server Configuration
Let’s get into actually configuring the VPN. As stated above this is the configuration and implementation of a Wireguard VPN.
SECTION II – A – Install Packages
Use the following command to install the Wireguard package onto the machine:
dnf install wireguard-tools

FIGURE 5 – Install Wireguard
With Wireguard installed you can confirm that it is working and installed using the following command:
wg version

FIGURE 6 – Wireguard Version
SECTION II – B – Generate Keys
Wireguard uses asymmetric key1 cryptography2. So we need to generate the public and private keys that our server is going to use.
First lets make a directory to store our keys in and then move into that new directory:
mkdir /etc/wireguard/keys
cd /etc/wireguard/keys
Now use the following command to generate the public and private keys:
wg genkey | tee privatekey | wg pubkey > publickey
SECTION II – C – Configuration File
Let go through creating the Wireguard configuration file.
Firstly, use the following command to display the server private key that we generated in the above section and copy its output:
cat /etc/wireguard/keys/privatekey
Then create the config file:
vi /etc/wireguard/wg0.conf
Now make sure that the config file looks similar to that listed in Example 1. NOTE: the default port for Wireguard is 51820, you can set it to whatever available port you want you just have to make sure it is allowed through the firewall in Section II – G.
[Interface]
PrivateKey = <Private Key>
Address = <Tunnel IP>/<Mask Slash Notation>
ListenPort = 51820
PostUp = iptables -A FORWARD -i wg0 -j ACCEPT; iptables -A FORWARD -o wg0 -j ACCEPT; iptables -t nat -A POSTROUTING -o <LAN Interface e.g ens18> -j MASQUERADE
PostDown = iptables -D FORWARD -i wg0 -j ACCEPT; iptables -D FORWARD -o wg0 -j ACCEPT; iptables -t nat -D POSTROUTING -o <LAN Interface e.g ens18> -j MASQUERADE
Example 1 – wg0 Config File
SECTION II – D – File Permissions
We need to ensure the security of the config file and the keys that we have created. So let’s set the permissions of those files using the following commands:
chmod 600 /etc/wireguard/wg0.conf
chmod 600 /etc/wireguard/keys/ -R
SECTION II – E – IP Forwarding
For the Linux machine to be able to route traffic between the tunnel interface and its LAN interface we need to enable the IP forwarding configuration. To do so edit the following file:
vi /etc/sysctl.conf
Then add the following line to that file:
net.ipv4.ip_forward = 1
Once that file is saved you then need to run the following command to immediately apply that configuration:
sysctl -p
SECTION II – F – Service
Now we have all the configuration for Wireguard completed we can go ahead and start the service and make sure that the service starts on boot:
systemctl start wg-quick@wg0
systemctl enable wg-quick@wg0
SECTION II – G – Host Firewall
We want external devices to be able to connect to our Linux server on the Wireguard port so we need to configure the host-based firewall to allow that port through:
firewall-cmd –add-port=51820/udp –permanent
firewall-cmd –reload
We also need to make sure that our new tunnel interface is added to the firewall:
firewall-cmd –add-interface=wg0 –permanent
firewall-cmd –reload
SECTION II – H – Port Forwarding
This step is only applicable if you are running your VPN server behind a home router. A Typical home router is set up to allow connections to be established from LAN devices out to devices on the internet. It is not set up to allow connections from the internet to be established to a LAN device. To allow this you have to set up something called port forwarding. This is a way to tell the home router to expect traffic from my public IP address to a specific port. The way that you configure your specific home router might be different to mine so it is best to Google what home router you have and then how to port forward.
For example you can see here my port forwarding configuration. NOTE: I am using the port 51821 for my Wireguard server.

FIGURE 7 – Port Forwarding
SECTION III – DuckDNS Configuration
Now that we have our VPN server configured and ready to go we need to make sure the VPN clients know how to get to my VPN server. As I said earlier in Section I – B the IP public IP address my ISP gives me a dynamic meaning it can change at any time. For the clients to always know where the VPN server is I am going to set up Dynamic DNS. This is a way for my VPN server to update my public IP address to a domain name that my VPN clients can resolve.
To start navigate to the DuckDNS website and log in. Enter a domain name and then click the ‘add domain’ button.

FIGURE 8 – DuckDNS
From the DuckDNS website make a note of your newly created domain name and your Token this will be required in a second.
On your Linux machine create a new directory for the DuckDNS script:
mkdir /etc/duckdns
Now in that new directory create a script file:
vi /etc/duckdns/duck.sh
Make sure that your script looks similar to Example 2.
echo url="https://www.duckdns.org/update?domains=[YOUR_DOMAIN]&token=[YOUR_TOKEN]&ip=" | curl -k -o /etc/duckdns/duck.log -K -Example 2 – dUCKdns sCRIPT
Set the permissions for your script so that it is executable:
chmod 700 /etc/duckdns/duck.sh
You can test the script works by running it:
/etc/duckdns/duck.sh
You should be able to see the output ‘OK’ if you display the log file:
cat /etc/duckdns/duck.log
Now we need to set a cron job for the file so that the script runs on a schedule. Enter the following command to edit the cron file:
crontab -e
Now make sure that the cron job entry looks similar to Example 3.
5 * * * * /etc/duckdns/duck.sh >/dev/null 2>&1Example 3 – Cron Job
SECTION IV – Wireguard VPN Client Configuration
With the VPN server set up and ready to go and a way for the clients to be able to access the VPN server setup all we need to do is to configure our clients. I am going to create a simple script on the VPN server that will create the client configuration files. The reason I am going to run this on the server is that every time you configure a new client you have to add some configuration to the ‘wg0.conf’ file we created earlier. This means that you generate the configuration files on the VPN server and then just need to copy them onto the clients. NOTE: I am going to add a Pre-Share Key (PSK) to the client configuration as an extra layer of security.
Before we start lets just quickly go over what this script is going to do. It will ask you for some details like name and tunnel IP. Then it will add the peer configuration to the server config file and create a file in a client directory. With the outputted file you just need to copy that onto your VPN client to be able to connect to your VPN server.
Let’s start by creating the directory for the client configs to be outputted to:
mkdir /etc/wireguard/clients
Use the following command to create the script:
vi /etc/wireguard/clientGenerate.sh
The script contents should look similar to Example 4.
#!/bin/sh

### Variables

serverIP="<Domain Name>.duckdns.org"
serverPort="<Wireguard Port e.g 51820>"
serverPubKey=$(cat /etc/wireguard/keys/publickey)

read -p "Enter Client Identifier: " client
read -p "Enter Client Tunnel IP: " clientIP
read -p "Enter Client Tunnel IP Subnet (Slash Notation): " clientSM

### Generate PSK

psk=$(wg genpsk)


### Generate Client Keys

clientPrivKey=$(wg genkey)

clientPubKey=$(echo $clientPrivKey | wg pubkey)

### Create Config File


touch /etc/wireguard/clients/$client.conf

function render_template() {
  eval "echo \"$(cat $1)\""
}


render_template /etc/wireguard/templates/client > /etc/wireguard/clients/$client.conf

### Add Peer to Main Server File

echo "### begin $client ###" >> /etc/wireguard/wg0.conf
echo "[Peer]" >> /etc/wireguard/wg0.conf
echo "PublicKey = $clientPubKey" >> /etc/wireguard/wg0.conf
echo "PresharedKey = $psk" >> /etc/wireguard/wg0.conf
echo "AllowedIPs = $clientIP/32" >> /etc/wireguard/wg0.conf
echo "PersistentKeepalive=25" >> /etc/wireguard/wg0.conf
echo "### end $client ###" >> /etc/wireguard/wg0.conf

### Restart Wireguard

systemctl restart wg-quick@wg0
Example 4 – Wireguard Client Generation Script
Now we need to set the permissions of the script to make it executable:
chmod +x /etc/wireguard/clientGenerate.sh
We now need to make a basic template for our script to use so lets start by making a directory for that template to sit in:
mkdir /etc/wireguard/templates
Now we can create the template file:
vi /etc/wireguard/templates/client
Make sure that your example file looks similar to Example 5.
[Interface]
PrivateKey = $clientPrivKey
Address = $clientIP/$clientSM
DNS = 8.8.8.8, 8.8.4.4

[Peer]
PublicKey = $serverPubKey
PresharedKey = $psk
Endpoint = $serverIP:$serverPort
AllowedIPs = 0.0.0.0/0
Example 5 – Wireguard Client Script Template
On the VPN client create a file.conf file and then save the output from the script to it. Now on the Wireguard application select the ‘Add Tunnel’ button and select your newly created file. This should input all the configuration you need for the tunnel automatically.
SECTION V – Confirmation
With both our VPN server and client all setup, the only thing left to do is to check it works. On the VPN server, you can use the following command to see if the peer is connected:
wg show
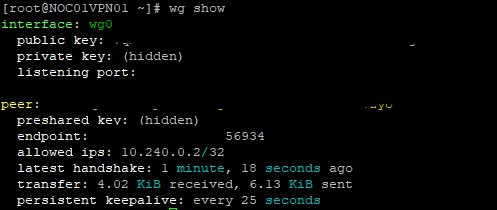
FIGURE 9 – Wireguard Confirmation
SECTION VI – Footnotes
- Asymmetric Keys – this is where you have 2 different encryption keys that are used in a key pair. You have a public and a private key. You dish out the public key to anyone and when they want to securely talk to you they use that public key to encrypt their data. Then that data can only be unencrypted by the private key that you hold. ↩︎
- Cryptography – this is a way of secure communication by the process of encrypting plain text into cipher text. ↩︎

Leave a comment