
Introduction
Let’s be honest, we all need better processes for our backups. It’s the dirty little secret of many people in Information Technology (IT). Some go for the do nothing approach. Some go for the overly complicated approach. I think a healthy balance in between the two can give you enough confidence in your home storage without you feeling like running your home IT is a systems admin job that never ends with no help.
In this post, we are going to go over how I have automated my home backup server to run. The goal I was trying to achieve with my set up is that the backup server will turn on a set few times a month, automatically backup my main Network Attached Storage (NAS) server and then power off again.
In addition to my main goal, I want visibility into the process so that I can have some assurance the automated process is working and if not then I can get notified.
Some things to note about my setup. My main NAS is a TerraMaster NAS using Butter File System (BTRFS). My backup server is a Dell Poweredge (hence why I’m so keen on automated power on and off to save some monies) running TrueNAS Core using Zettabyte File System (ZFS). My home service monitoring is done by Uptime Kuma and I use Home Assistant as my dashboard and home service manager.
Section I – Automated Server Power On
So first I need to tackle how I am going to get the server to power on. There are a few different ways to do this:
- Use Wake on Local Area Network (LAN) to send a magic packet to the backup server from a server that is always on.
- Use Integrated Dell Remote Access Controller (iDRAC) and send a power on command to iDRAC to start the server.
- Set the power recovery within the Basic Input Output System (BIOS) of the server to on and then whenever power is applied to the server it will automatically start up.
I opted to go for the third option for a couple of reasons. First, for Wake on LAN the server needs to be a specific shutdown state where the Network Interface Card (NIC) is still powered to receive and process the magic packet. Second, I have run out of physical switch interfaces in my setup and I would want to run iDRAC over the dedicated Integrated Platform Management Interface (IPMI). Solution three offered me an easy to implement option for my setup.
Okay so how did I implement this?
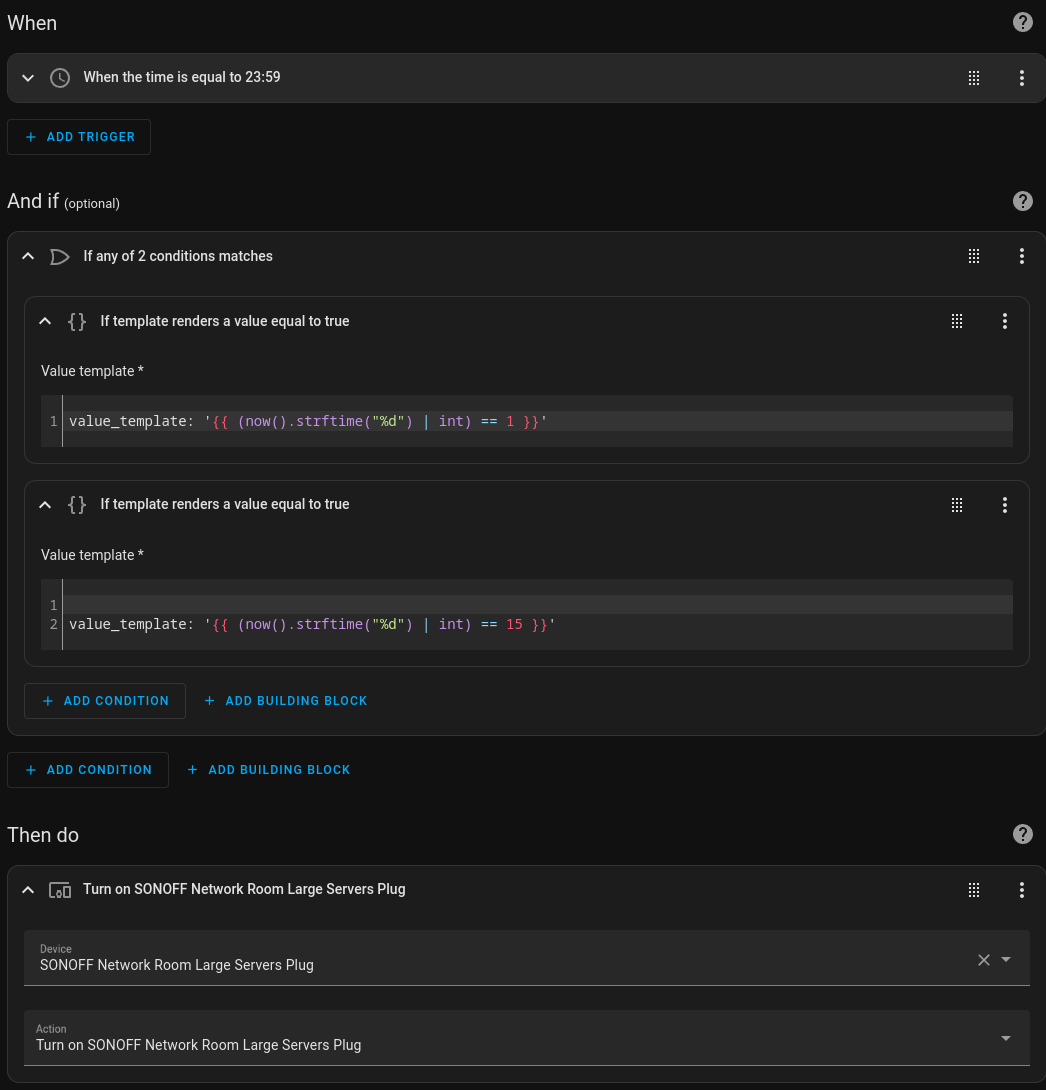
Firstly, I needed to set the BIOS on the backup server to power on upon power recovery. Next, I brought myself a smart plug so I could control the plug over my home network. Then, I connected the smart plug into Home Assistant via an existing integration. Finally, I configured automation on Home Assistant to run and power on the server at 2359 on the 1st and 15th of the month.
Section II – Automated Backup
We have a backup server that now powers itself on. The next step in the process is to get it to actually do what it is needed for…… carry out a backup of my main NAS data.
If I was running 2 separate NAS servers that both had ZFS then you can set up replication between the server datasets and after an initial sync it would require a lot less incremental revisions to maintain the file system. If I was to go down this route then I would opt for running my backup server much more consistently.
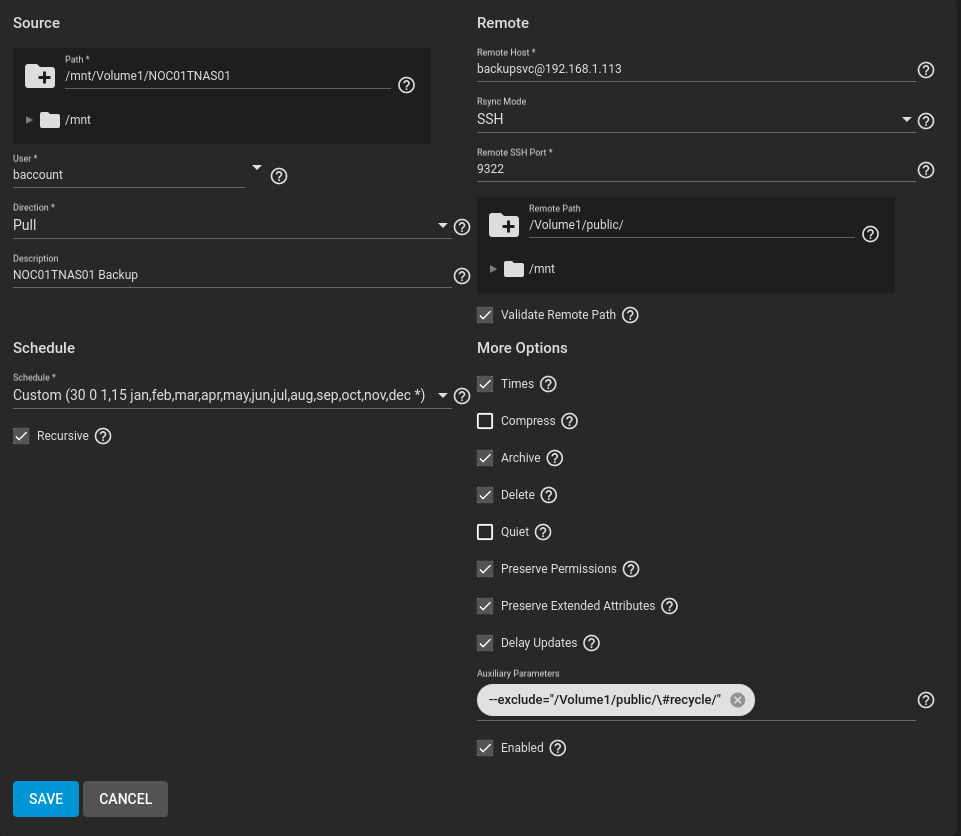
However, my main NAS runs BTRFS and the backup NAS is on ZFS. So I opted to use Rsync to carry out my data replication. With that decided I needed some way to make it more secure. When adding security I wanted to avoid the need for passwords where I could. I choose to implement Rsync over Secure Shell (SSH) which conveniently is very easy to do within TrueNAS Core.
A quick point to note for setting up backup server SSH. You want the backup server to initiate the connections to your main servers rather then the other way around. From a security standpoint if someone were to compromise my main NAS all they would need to do is wait till my backup NAS boots up and then if the SSH key stored on the main NAS they could access the backup NAS then the attacker could comprise my backups. The alternative, is to use a private SSH key stored on the backup NAS that is allowed access to the main NAS and the backup server initiates the connections.
I will give a quick high level overview of how I set this up:
- Created a backup service account on my backup server.
- As that backup service account I generated him a Rivest, Shamir, Adleman (RSA) SSH key pair.
- I copied the backup service accounts public key to the main NAS and stored it in its backup service accounts SSH Authorised Keys file.
- I edited the main NAS SSH configuration to allow public key authentication and allow SSH login to its backup service account.
vi /etc/ssh/sshd_config
PubkeyAuthentication yes
  #The default is to check both .ssh/authorized_keys and .ssh/authorized_keys2
  #but this is overridden so installations will only check .ssh/authorized_keys
  AuthorizedKeysFile      .ssh/authorized_keys
  AllowUsers <USERNAME>
ssh-keygen
echo “<TrueNAS Public Key>” >> ~/.ssh/authorized_keys
Some useful troubleshooting:
- If you cannot connect make sure that the public key in the authorised keys file on the SSH server is exactly as it is on the client (I missed copying the first ‘S’ of SSH and spent an hour trying to figure out why it wasn’t working).
- Use the verbose flag when manually initiating the SSH connection to view information about the connection.
ssh -vvv <USERNAME>@<HOSTNAME or IP>
With SSH setup and working the Rsync configuration is fairly straight forward on TrueNAS. It is using Linux Cron job to run the Rsync task on a schedule.
Section III – Monitoring
I have a server that powers itself on and an Rsync task that will automatically sync my data. Now I want some way to provide an easy way to know if this has worked when I wake up in the morning.
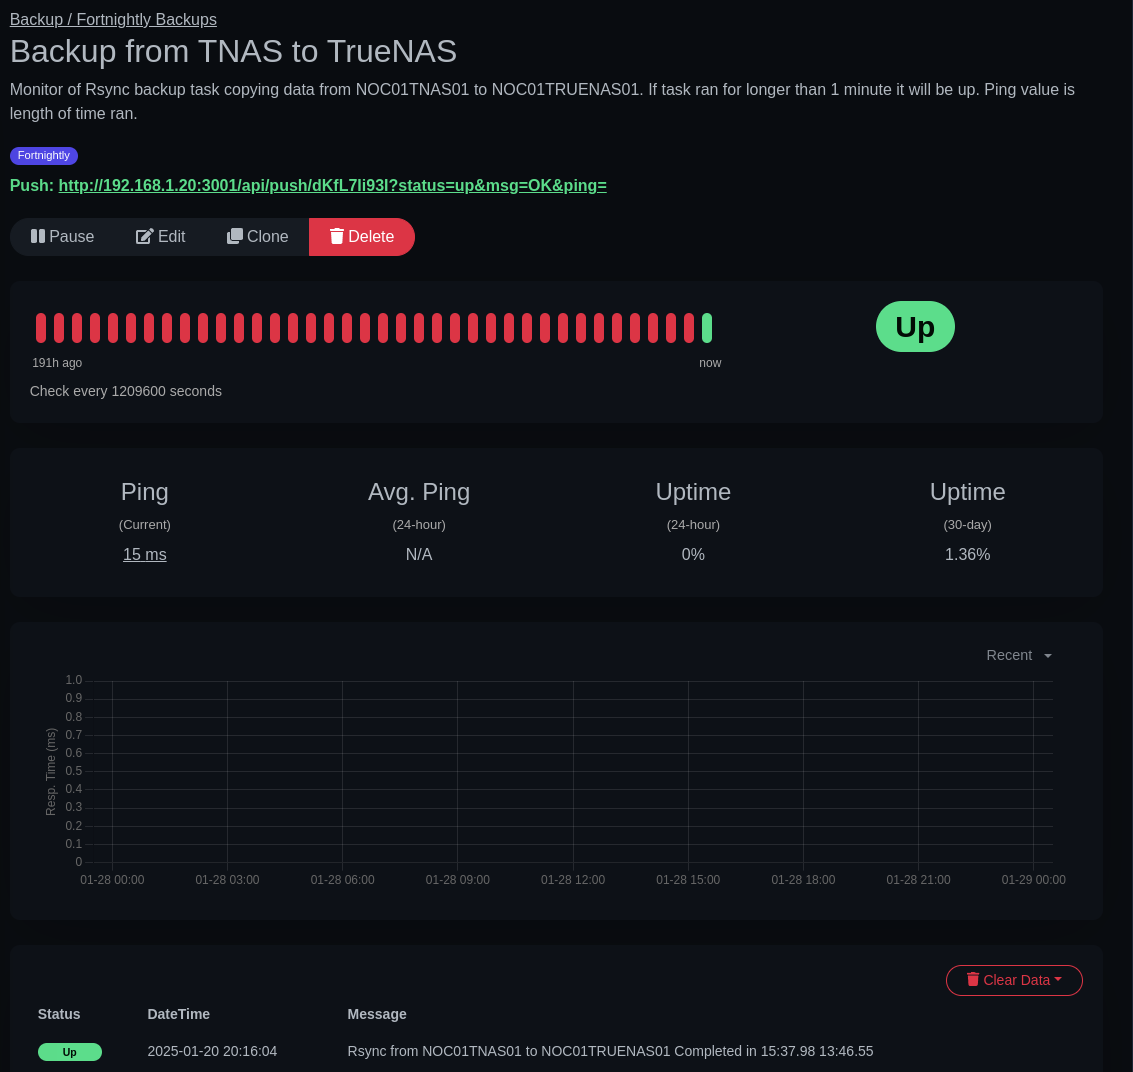
As I mentioned earlier I am using Uptime Kuma as my home services monitoring system. Within it you can set up push monitors where I can push data to the monitor.
I wrote a simple Bourne Again Shell (BASH) script that again uses a Cron job to start the script. The script is set to start just after the Rsync task starts and every 10 minutes it will look at the processes running. If my backup service account still has an Rsync and SSH process running then it assumes the backup is still running and sleeps for 10 minutes before checking again. The script does a basic validation that the Rsync task has run for my than 1 minute of processor time to state whether the backup has been successful or failed. Finally, when completed the script will push to the Uptime Kuma monitor the state of the backup and the processor time used by it.
Another point to note, the script is a work in progress so adding in some extra validation to make sure once the Rsync is complete the important files are there and valid is a task on my backlog of TODOs.
Below is my current monitor script:
#!/bin/bash

  RSYNC_PROCESSES=$(ps -U baccount | grep -e "/usr/local/bin/rsync" | wc -l)
  SSH_PROCESSES=$(ps -U baccount | grep -e "ssh" | wc -l)

  echo "$RSYNC_PROCESSES"
  echo "$SSH_PROCESSES"

  while [ "$RSYNC_PROCESSES" -ne "0" -a "$SSH_PROCESSES" -ne "0" ]
  do
  	echo "Task Running"

  	TIME=$(ps -U baccount | grep -e "/usr/local/bin/rsync" | awk '{print $4}')

  	if [ "$TIME" != "0:01.00" ]; then
          	STATUS="up"
  	else
          	STATUS="down"
  	fi

  	echo "Start 10 minute sleep"
  	sleep 600

  	RSYNC_PROCESSES=$(ps -U baccount | grep -e "/usr/local/bin/rsync" | wc -l)
  	SSH_PROCESSES=$(ps -U baccount | grep -e "ssh" | wc -l)

  done

  MESSAGE="Rsync from NOC01TNAS01 to NOC01TRUENAS01 Completed in ${TIME}"

  URL="http://192.168.1.20:3001/api/push/dKfL7Ii93I?"

  curl \
      --get \
      --data-urlencode "status=${STATUS}" \
      --data-urlencode "msg=${MESSAGE}" \
      --data-urlencode "ping=${TIME}" \
      --silent \
      ${URL} \
      > /dev/null
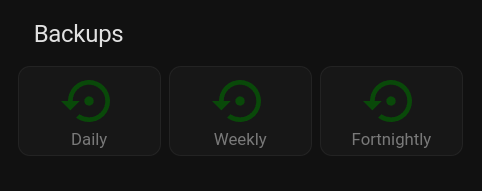
For my easy visibility, I have a card on my Home Assistant dashboard that has each of my backup categories. The icon will turn red if the monitor on Uptime Kuma goes down.
Section IV – Automated Server Power Off
Onto the last piece of the puzzle, how do I get my server to turn off safely without accidentally corrupting my backups?
After some Googling I came across a simple idea of using a BASH script to see if certain processes have been stopped or are idle for a period of time and then shutting the server down.
The script I wrote checks if there are any established SSH or Hyper Text Transfer Protocol Secure (HTTPS) connections as well as if the backup service account Rsync or SSH process is running. If any of the checks come back as true then the script will end. However, if all of the checks are false then the script will run a final script to update my Uptime Kuma monitors of the storage space left on the server and then shut itself down.
The script is set to run every half an hour on a Cron job.
Below is the current shutdown script:
#!/bin/bash

  SSH_CONNECTIONS=$(netstat | grep -e "ESTABLISHED" | grep -e ".ssh" | wc -l)
  HTTPS_CONNECTIONS=$(netstat | grep -e "ESTABLISHED" | grep -e ".https" | wc -l)
  TNAS_SSH_CONNECTIONS=$(netstat | grep -e "ESTABLISHED" | grep -e ".9322" | wc -l)
  RSYNC_PROCESSES=$(ps -U baccount | grep -e "/usr/local/bin/rsync" | wc -l)
  SSH_PROCESSES=$(ps -U baccount | grep -e "ssh" | wc -l)

  echo "$SSH_CONNECTIONS"
  echo "$HTTPS_CONNECTIONS"
  echo "$TNAS_SSH_CONNECTIONS"
  echo "$RSYNC_PROCESSES"
  echo "$SSH_PROCESSES"

  if [ "$SSH_CONNECTIONS" -ne "0" -a "$HTTPS_CONNECTIONS" -ne "0" -a "$TNAS_SSH_CONNECTIONS" -ne "0" -a "$RSYNC_PROCESSES" -ne "0" -a "$SSH_PROCESSES" -ne "0" ]; then

  	echo "Processes Running"

  else

  	echo "Shutdown"
  	/root/NOC01TRUENAS01_BACKUP_DISK_USAGE.sh
  	/root/NOC01TRUENAS01_ROOT_DISK_USAGE.sh
  	poweroff

  fi
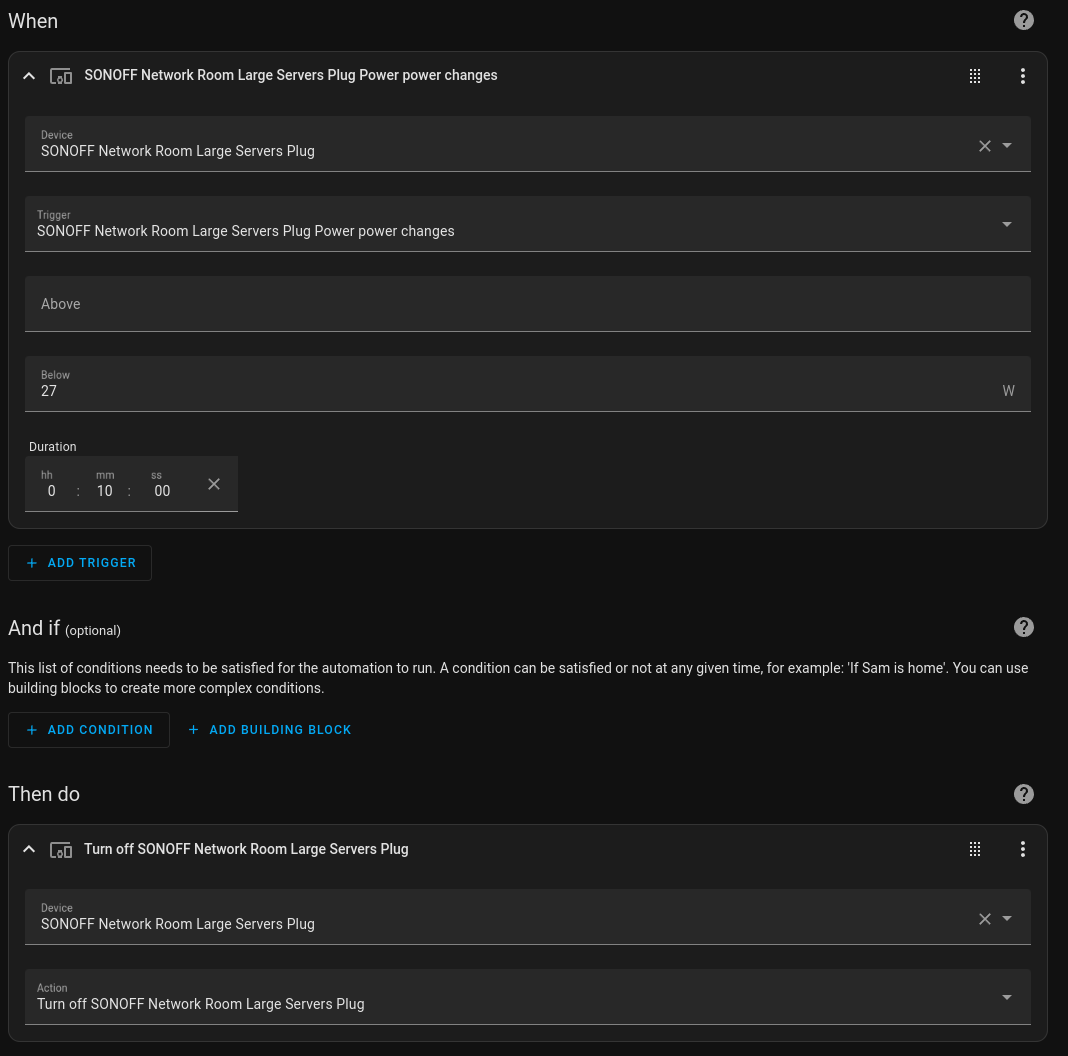
When the Dell Poweredge server powers off it will stay on in a certain shutdown state and still draw power keeping iDRAC alive. While this isn’t an overly big deal because it only draws around 24 watts, if you look at that running 24/7 it soon does mount up a cost. What I want is to know when the server is in this state and then turn the smart plug back off so that is it ready for the next backup cycle.
Using Home Assistant I monitor the power draw of the plug and when it is below 27 watts for 10 minutes then it will turn the plug off.

Leave a comment