
Introduction
In today’s post, we are going to go through some of the technologies within Linux that are working behind the scenes to help containers work. The main focus of the post is to go through how a container is isolated from the host machine.
Section I – What is a Container & Container Isolation?
Containers are services or application that are fully packages with everything that is required to run the service or application. This means that the container can be run on any machine without having dependency issues. The underlying technologies essentially mean that when a container is running it is really just a containerised process running on a host machine.
Containers are able to run as isolated processes by using Linux Namespaces to isolate the processes that the container is running from all of the other processes currently running on the host.
Namespaces are used within Linux to control what a process can see. It is a way to restrict the resources that are visible to. Each process can only be a part of 1 namespace of each type.
If we run the following command as root we get a list of the namespaces present on the system.
lsns

The most common Linux Namespace types are:
- Unix Timesharing System
- Process IDentifiers (PID)
- Mount
- Network
- User
- Inter-Process Communication (IPC)
- Control Groups (Cgroups)
Section II – Unix Timesharing System
The Universal Timesharing System namespace is mainly just used for separation of hostnames within Linux today. The name dates back to the early days of Unix and how it uses to store information for a specific system call.
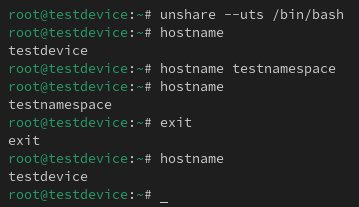
If I run the following command you can see that the hostname of my machine is ‘testdevice’.
hostname

Now if I use the ‘unshare’ command to create a new shell process with a different UTS namespace I am able to change the hostname without affecting my actual ‘testdevice’ hostname.
unshare –uts /bin/bash
Section III – PIDs
Firstly, lets understand what a PID is. A process identifier is a way for the system to track a specific task that is being carried out.
The Process Identifiers namespace allows for the separation for PIDs. This means PIDs in a single namespace cannot see PIDs in another namespace.
If i use the ‘unshare’ command again but this time set it so it creates a separate PID namespace we will be able to view the process tree using the ‘ps fa’ command and see the ‘ps fa’ command is under the new PID namespace under our unshare command.
unshare –pid –fork /bin/bash

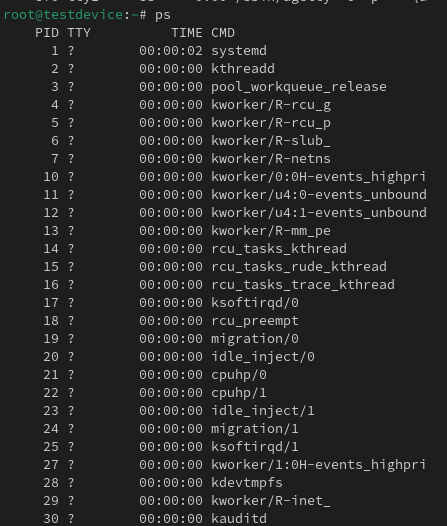
There is an issue though, we want to run the ‘ps’ command and only see the processes that are running in our isolated namespace. The issue is that the ‘ps’ command will look at the ‘/proc’ directory and will information from there. So even if we are in a new PID namespace we are still going to be able to run ‘ps’ and list all the processes running on the host system. In order to change this behaviour we need to adjust that is in the ‘/proc’ directory for our isolated namespace.
What we can do is use the change root command to adjust that is see inside out isolated PID namespace.

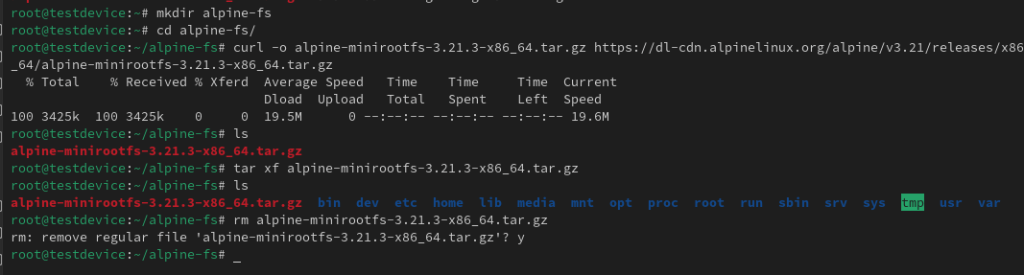
I am going to clone the Alpine Linux file system onto my device. Alpine Linux is a very lightweight Linux distro often used for containerised applications. To create the file system follow these commands:
mkdir ./alpine-fs
  cd ./alpine-fs
  curl -o alpine-minirootfs-3.21.3-x86_64.tar.gz https://dl-cdn.alpinelinux.org/alpine/v3.21/releases/x86_64/alpine-minirootfs-3.21.3-x86_64.tar.gz
  tar xf alpine-minirootfs-3.21.3-x86_64.tar.gz
  rm alpine-minirootfs-3.21.3-x86_64.tar.gz
Now we have the file system, we can use the change root command to set the root directory as our Alpine Linux file system and then open a shell in that new file system. I will use the ‘/etc/os-release’ to prove the Linux instance I am in.
chroot alpine-fs/ /bin/sh

So no we have a way to change the root file system point and to isolate the PID namespace, lets put them both together. NOTE: when you are in the new file system, the Alpine Linux one in my case, you need to make sure your $PATH is set correctly, because by default it will inherit the host systems $PATH environmental variable.
unshare –pid –fork chroot ./alpine-fs /bin/sh
Once I am in the new shell I can mount a pseudofilesystem with a type of proc into my /proc directory so when I run the ‘ps’ command I will be able to see only the processes running in my Alpine Linux instance.
mount -t proc proc proc
ps

Section IV – Mount
The mount namespace is a way to isolate the different mount points from different namespaces. This means as a process runs within a namespace it can only see the portion of the file system that is has available in its mount namespace rather than the entire file system.
If we use the example from Section V we can see that I mounted to /proc in my Alpine Linux file system without setting up a new mount namespace. So when I run the ‘mount’ command on the host I can see that mount entry.

However, now I am going to open a shell in Alpine Linux again but this time I will specify a new mount namespace. I will go through again and mount the /proc directory and if I look back at the mount point list within the host this time you won’t be able to see it.
unshare –mount chroom ./alpine-fs /bin/sh
mount -t proc proc proc
mount


Section V – User IDs
User Identifier is a number used to unique track a user within the Linux system. Using an ID means that different attributes of the user can change and the system can still properly reference it.
All systems track file ownership and permissions in order to know which uses are allow to access or run what files. User namespace is a way to isolate the user identifiers table between namespaces. This can allow a process to think it is running as root, however, it only has a users permissions that have been mapped across.

If I create a new user namespace, you can see the process I have run in that namespace has no user mapping so appears as nobody:
unshare –user /bin/bash
id

Now if you use the ps command to find the PID you can create a mapping between the user namespaces. The formulation of the ‘uid_map’ is the lowest new user namespace UID, lowest main user namespace UID and then the number of UIDs to map. In the below example I want my test user with UID 1002 to become root with UID 0 and I only want to map across 1 UID.. This mapping needs to go in the corresponding PID /proc directory:
echo ‘0 1002 1’ > /proc/2769/uid_map

NOTE: don’t be alarmed if the user mapping doesn’t update straight away.
Section VI – Inter-Process Communication
Inter-Process Communication handles the communication between different processes and the shared resources of the system for example processes putting in requests for memory to store their instructions.
The Inter-Process Communication namespace is a way to isolate how processes communicate with each other and the shared resources they have access to. Typically within a container we don’t want it to be able to interact with the resources used by another container, so this isolate is ideal.
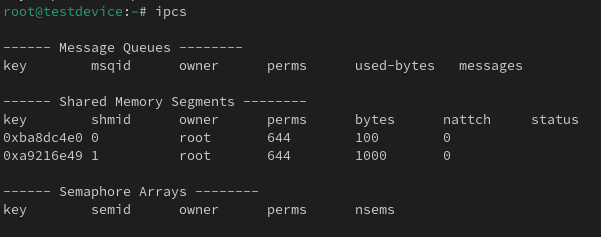
On the host you can view the IPC status using the following command:
ipcs
Now if I create a new namespace for IPC then you will be able to see there are no other share processes in there.
unshare –ipc /bin/bash

Section VII – Control Groups
Control Groups are a way to control the resources that a process or group of processes can utilise. The includes the CPU, memory and network resources.
Cgroup namespace allows you to control the amount of resources available to a process or group of processes that can be separate from other namespaces resource allocations. It essentially stops the direct inheritance from the hierarchy of Cgroup directories.
I can use the following to print out the contents of the cgroup file and then create a new cgroup namespace and then do the same:
cat /proc/self/cgroup
unshare –cgroup /bin/bash

You can see that the cgroup from the default namespace isn’t inherited into the new namespace.
Section VIII – Network
Network namespace is a way to isolate the networking function within the system. It means that within each unique namespace you will be able to assign any IP address of port number that is already present in another namespace. In order to get network traffic to traverse to the physical network adapter on the system you need to bridge from the virtual adapter in the namespace to the physical adapter on the system.
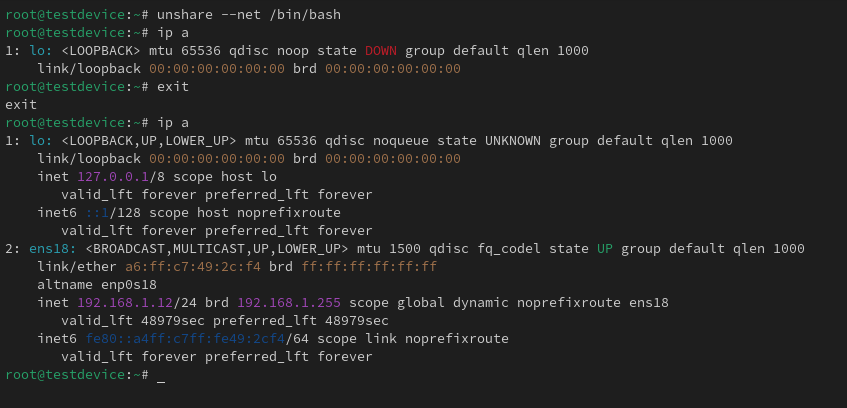
I can use the following command to create a shell in a new network namespace. And as you will be able to see by default just a loopback interface is present. When we compare this to my main network namespace you can see the physical adapter on the host.
unshare –net /bin/bash
ip a
If I want to be able to communicate out of the hosts physical interface I need to create a virtual ethernet interface on both the host and in the new namespace to act almost as a network cable between the two namespaces.
Using the ‘lsns’ command we can find out the PID of the new network namespace.
lsns -t net

Now with that information I can run the following command to a veth peer between the 2 network namespaces.
ip link add <New Net Namespace Interface Name> netns <New Net Namespace PID> type veth peer name <Default Net Namespace Interface Name> netns <Default Net Namespace – should be 1>
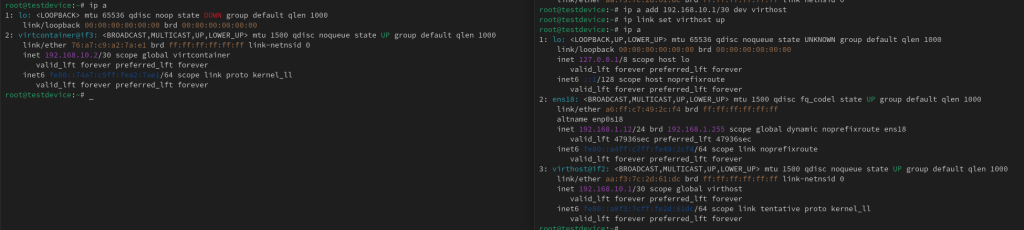
Using the ‘ip a’ command I can see that new interface listed in both namespaces.
ip a

Now I just need to add an IP address to both interfaces and then bring the links up.
ip a add <IP>/<Subnet Slash Notation> dev <Interface Name>
ip link set <Interface Name> up
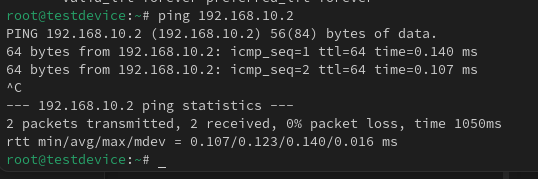
Now there should be a successful ping across the virtual cable.

Leave a comment