Time to read:
In this article, we are going to go over how to install the GNS3 VM (Virtual Machine) on a Proxmox 8 instance. This assumes that you already have your Proxmox server set up and ready to go. Additionally, I am assuming that you have a way to get files onto the Proxmox server through the CLI (Command Line Interface), for example, you could use WinSCP1 to transfer the files to the server or in my case I am going to use a locally hosted HTTP (Hyper-Text Transfer Protocol) server hosted on my Proxmox instance.
What is GNS3?
GNS3 (Graphical Network Simulator 3) is a software tool that allows you to run virtualised network devices to simulate a real network environment. This tool lets you get hands-on with configuring devices and fault-finding networking-related problems without the need to have any physical networking equipment.
- SECTION I – Download Latest VM Package
- SECTION II – Creating the VM
- SECTION III – Start VM
- SECTION IV – Footnotes
SECTION I – Download Latest VM Package
Before we can do anything we need to get a copy of the latest GNS3 server VM downloaded. There are 2 different ways you can get a copy; from the official GNS3 website or the official GNS3 GitHub repository.
Carry out with the steps in ‘Section I – A‘ or ‘Section I – B‘
SECTION I – A – Official Website
- Navigate to the following website – Software | GNS3.
- Click the download button for the ‘VMware ESXi’ version.

FIGURE 1 – VMware ESXi Download
SECTION I – B – GitHub Repository
- Navigate to the following website – Releases · GNS3/gns3-gui (github.com).
- Locate the ‘GNS3.VM.VMware.ESXI.(version).zip’ file under the ‘Assets’ heading on the repository page.
- Click on the located file from step 2 to start the download.

FIGURE 2 – VMware ESXi Download
SECTION II – Creating the VM
Now we have the required files to be able to create the VM we need to create the actual VM. Make sure you have access to your Proxmox instance Web GUI (Graphical User Interface) for the following sections. You should also make sure that the VM files that you downloaded are accessible from your Proxmox instance.
SECTION II – A – Create VM
- Navigate to your Proxmox Web GUI using either ‘IP:8006’ or ‘hostname:8006’ to access it.
- In the top right-hand corner of the page select the ‘Create VM’ button.
- Make sure the correct Proxmox node is selected and should you need to place the VM in an appropriate resource pool then do that here.
- Give the VM an appropriate name and then click the ‘Next’ button.
- Under the OS (Operating System) tab, select the ‘Do not use any media’ radio button and make sure that the ‘Guest OS’ is set to ‘Type: Linux’ and ‘Version: 6.x – 2.6 Kernel’ and then click the ‘Next’ button.
- Under the System tab, you can leave all the settings default, however, you need to make sure the ‘SCSI Controller’ is set to ‘VirtIO SCSI’ and then click the ‘Next’ button.
- Under the disks tab, you can leave it blank and then click the ‘Next’ button.
- Under the CPU tab, you can set however many ‘Sockets’ and ‘Cores’ appropriate for your environment. Make sure to set the ‘Type’ to ‘host’ and then click the ‘Next’ button.
- Under the Memory tab, set however much memory is appropriate to your environment and then click the ‘Next’ button.
- Under the Network tab, you can leave all the settings default, you just need to make sure that the VM is in the correct bridge appropriate to your environment and then click the ‘Next’ button.
- On the Confirm page, make sure that you are happy with all the settings that you have confirmed and then click the ‘Finish’ button.

FIGURE 3 – Create VM

FIGURE 4 – Guest OS
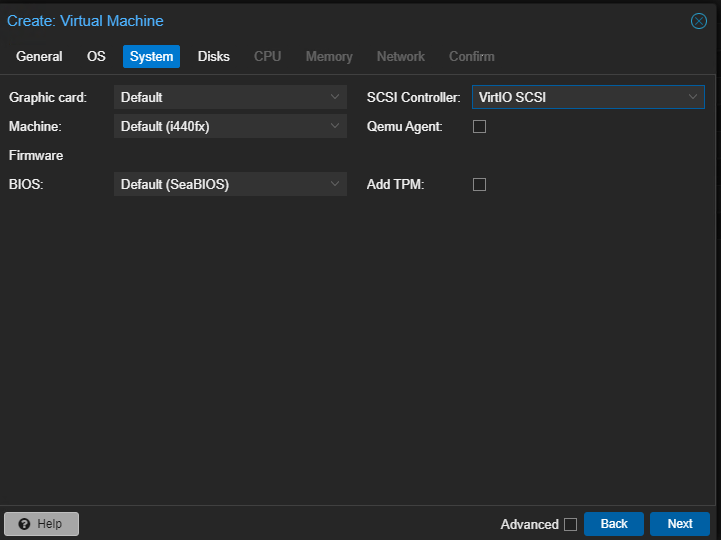
FIGURE 5 – VM System Settings

FIGURE 6 – VM Disks

FIGURE 7 – VM CPU

FIGURE 8 – VM Memory

FIGURE 9 – VM Network

FIGURE 10 – Confirm VM Settings
The VM will now be created and will appear in your VM list for the Proxmox host. You will not be able to start the VM because it has not disk or boot media attached.
SECTION II – B – Attach Disks to VM
As mentioned earlier in the article make sure that the .zip file you downloaded in ‘Section I‘ is reachable from your Proxmox instance.
- Open a Windows file explorer window and locate the downloaded server .zip file.
- Right click on it and select ‘Extract All….’.
- If you are happy with the default file path then click the ‘Extract’ button.
- Once extracted you should see a file in the newly created folder called ‘GNS3 VM.ova’.
- This part of the guide may differ depending on your setup, the goal here is to get the extracted ‘.ova’ file onto the Proxmox instance so that it is accessible from the CLI. In my set up, I have the file hosted on a local HTTP server and using the ‘wget’ command I can get the file downloaded onto the Proxmox instance.
- Extract the ‘.ova’ file using the following command:
- Navigate to the Web GUI of your Proxmox instance and under the ‘VM’ folder in the left-hand navigation locate the ID number of the GNS3 server VM. In my case, it is ‘119’.
- Back onto the Proxmox CLI run the following 2 commands to attach the extracted ‘.vmdk’ disk files to the VM.
- Navigate back to the Web GUI of the Proxmox instance select the GNS3 VM and then navigate to the ‘Hardware’ tab. Notice that you will now see ‘Unused Disk 0’ and ‘Unused Disk 1’.
- Double-click on the first unused disk ‘Unused Disk 0’.
- Leave all the settings default and then click the ‘Add’ button.
- Repeat steps 10 and 11 for ‘Unused Disk 1’.

FIGURE 11 – Extract All From ZIP File
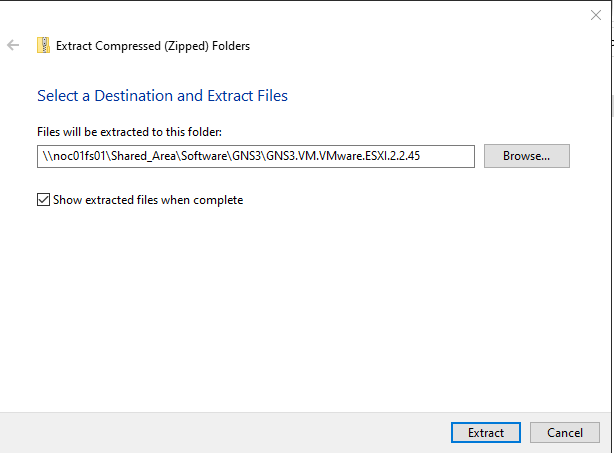
FIGURE 12 – Extract ZIP File

FIGURE 13 – Extracted OVA File
wget (URL)
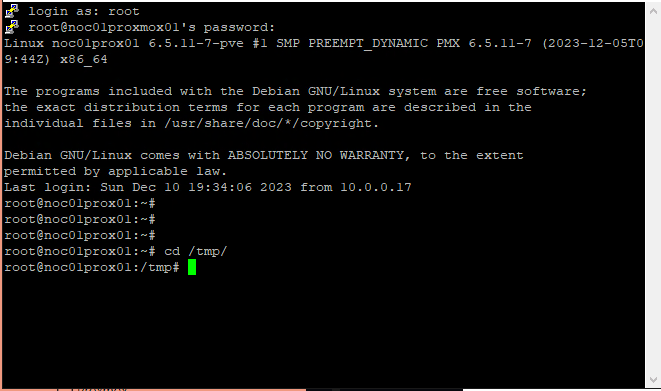
FIGURE 14 – TMP Directory

FIGURE 15 – WGET OVA File
tar -xvf ‘GNS3 VM.ova’
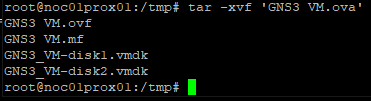
FIGURE 16 – Extract OVA File

FIGURE 17 – GNS3 VM ID
qm importdisk (VM ID) GNS3_VM-disk1.vmdk local-lvm -format qcow2
qm importdisk (VM ID) GNS3_VM-disk2.vmdk local-lvm -format qcow2

FIGURE 18 – VM Hardware Settings

FIGURE 19 – Add Unused Disk 0
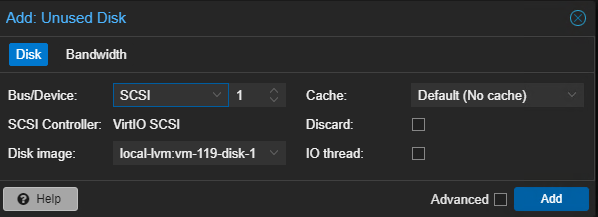
FIGURE 20 – Add Unused Disk 1
SECTION II – C – Set VM Disk Boot Order
- Within the Web GUI for the Proxmox instance navigate to the GNS3 VM and then to the ‘Options’ tab.
- Select the ‘Boot Order’ option and then click the ‘Edit’ button.
- Deselect the ‘ide2’ and ‘net0’ devices and select the ‘scsi0’ device then click the ‘OK’ button.

FIGURE 21 – VM Options

FIGURE 22 – Edit VM Boot Order
SECTION III – Start VM
- Within the Web GUI for the Proxmox instance navigate to the GNS3 VM and then to the ‘Console’ tab.
- Click the ‘Start Now’ button.
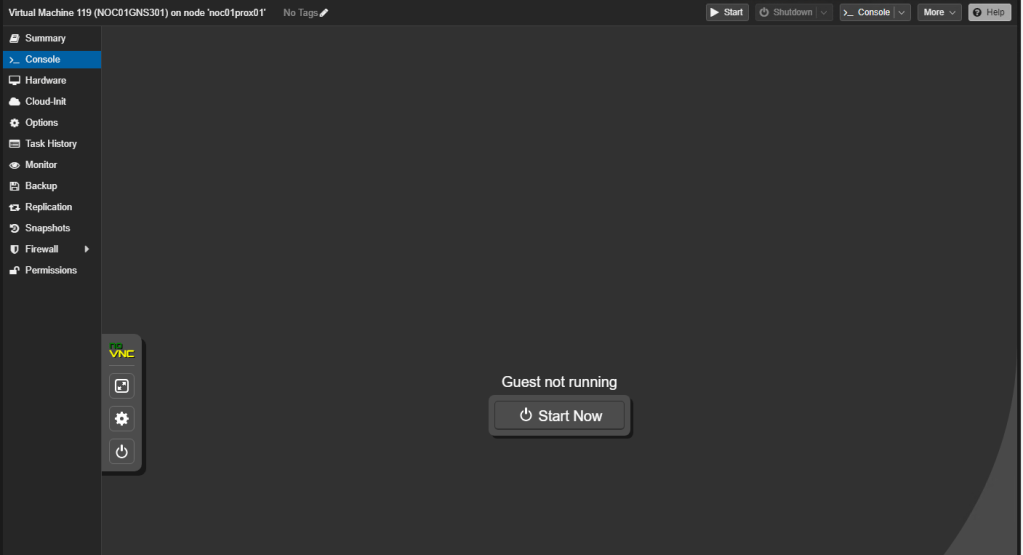
FIGURE 23 – Start VM Now
Once the VM has booted you now have a GNS3 VM server instance running on your Proxmox server. You can set the IP (Internet Protocol) address of the server or let it pick an IP up via DHCP (Dynamic Host Configuration Protocol). Then you can connect to the server via a web browser or using the GNS3 Client – Software | GNS3.
SECTION IV – Footnotes
- WinSCP – Windows Secure Copy Protocol, is an open source SSH (Secure Shell) based file transfer protocol. To download WinSCP use the following link – WinSCP :: Official Site :: Free SFTP and FTP client for Windows ↩︎

Leave a reply to samswinson100 Cancel reply